How to solder a toggle switch depends on the size of the toggle switch and the gauge of wire (AWG).
The maximum current limit of the majority of toggle switches used in electronics is 5 A or less (5A at 125V, 3A at 250V AC), so there is no need to solder very thick wires to toggle switch to connect it with the rest of the circuitry. We usually use 22 AWG or thinner wires for soldering on toggle switches.
Wiring of the terminals of the toggle switch can be done with stranded wires or solid wires.
Stranded wire is more flexible than solid wire and therefore it is easier to work with.
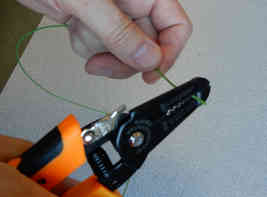
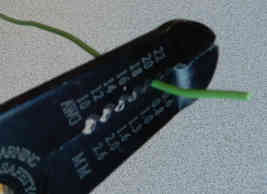
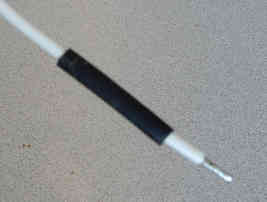
The first step in this soldering project is the removal of insulation from the wire.
Use wire strippers with gauge index, run the wire through the proper gauge slot on wire strippers and strip 1/4 “ (6 mm) of insulation from the wire’s end.
When you use a gauge slot on wire strippers that matches with the AWG size of wire you will not damage or scratch copper wire during stripping of insulation.
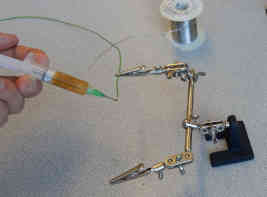
Tinning wire
The next stage is tinning wire.
Place wire in the helping hand tool. You will hold a soldering pencil in one hand and with the other hand feed the solder so you need this helping hand tool to hold the wire. It would be very difficult to tin a loose wire laying on the workbench.
Before you turn on the soldering iron, choose the appropriate iron tip for soldering a toggle switch. Replace the iron tip while soldering iron is cold and turn on the iron.
In this how to solderguide we are using chisel tip 1/16” (1.60 mm).
Add a small quantity of rosin flux to the top surface of the wire.
You can tin wire without adding rosin flux if you are using soldering wire with flux in its core. Majority of the today’s soldering wire come as flux-cored solders.
Anyway, adding a little bit of flux on the wire before tinning will make the tinning process a smoother operation regardless of which soldering wire you are using (with or without flux in its core).
Clean the hot soldering iron on a moist sponge and place it on the wire.
The melting point of flux is lower than the melting point of the solder. Flux will melt and flow around the wire. You will notice smoke coming from the flux when flux starts to melt. It is always recommended to use a portable benchtop smoke extractor to absorb smoke during soldering.
After a few seconds apply some solder to the wire at the contact area between wire and iron tip (don’t feed solder directly to the iron tip).
It takes only a few seconds for the proper tinning of wire.
Remove soldering iron, clean iron tip on the moist sponge from excess solder and place in the iron stand.
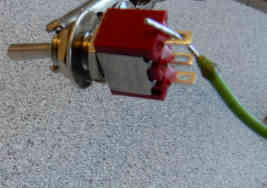
Run the wire through the hole in the terminal, if possible, to measure the correct length.
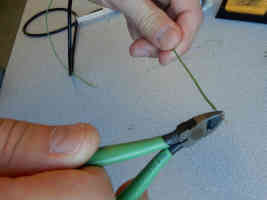
Cut the excess of the wire with wire cutters.
If it is not possible to insert the wire through the hole, then place the wire parallel to the terminal and measure the correct length.
The wire should be touching the surface of the terminal along the entire terminal’s length. The edge of insulation should be flush with the top of the terminal.
How to Solder a Switch
Terminals of the toggle switch should be tinned as well.
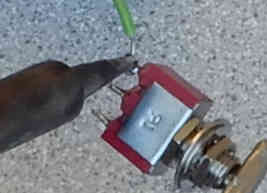
The majority of toggle switches come with terminals that have holes inside them.
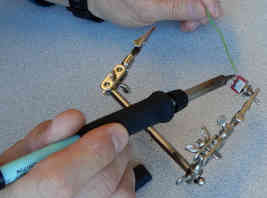
Place the toggle switch in the helping hand tool.
The solder will not stick to the surface of the terminal if the surface is not clean. Make sure that all terminals of the toggle switch are clean before tinning. Use isopropyl alcohol for cleaning terminals.
There are three options how to solder wires to toggle switch:
Option 1
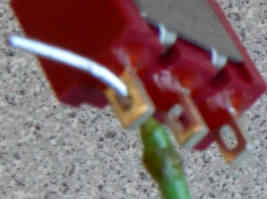
Run a thin wire through the hole before soldering to make a stronger connection between wire and terminal.
Option 2
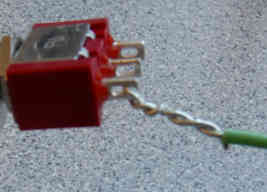
Run a thin wire through the hole and twist it several times before soldering to make an even stronger connection between wire and terminal.
Option 3
If the diameter of the wire is bigger than the diameter of the hole in the terminal, you will not be able to run the wire through the hole.
In this case, place the wire parallel to the terminal and solder it.
In any of these three options, terminals of the toggle switch should be tinned before soldering.
Apply a small quantity of solder flux to the terminal.
Tinning of terminals is not a difficult task, however, it is the most important step.
Too many times I have seen people damage switch during this operation. Sometimes solder doesn’t stick to the surface of the terminal, especially if the terminal is not clean or hot enough, so people hold soldering iron on the terminal for too long hoping that solder will eventually stick to the terminal.
If you hold soldering iron too long on the terminal it may melt a plastic body around the terminal and damage the switch. It is unbelievable how easy a terminal of the toggle switch may drop from the body of the toggle switch when you heat it. Once a terminal is separated from the body of the toggle switch it is not possible to repair the switch – you will need a new toggle switch.
Therefore, to avoid damaging toggle switch make sure to follow these recommendations:
Soldering toggle switch should be done quickly. Don’t hold the soldering iron on the terminal for too long - a couple of seconds should be good enough
Apply rosin flux to each terminal before tinning. The flux will protect soldering surfaces from oxidation during tinning and that way make this process smoother and quicker.
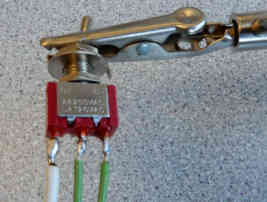
How to Solder Wires to a Switch
Once the wire and terminals are tinned, it is just a matter of connecting them together.
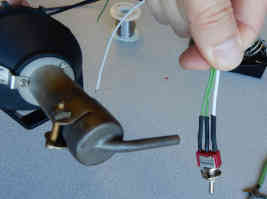
At this point slide a piece of heat-shrink tube on the wire to be soldered to the terminal.
Once the wire is soldered to the terminal it will not be possible to insert heat shrink tubing on the wire if the other end of the wire is already connected.
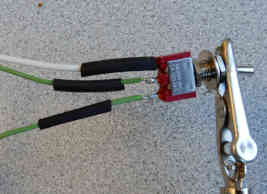
Heat-shrink protects and isolates the connection.
First, place a wire on the terminal and then place the tip of the soldering iron at the soldering joint where the wire touches the terminal.
The soldering iron should heat both the wire and terminal simultaneously. Again, don’t hold the soldering iron on the terminal for too long.
There should be enough solder on the wire and terminal to make a good connection. You don’t need to feed more solder to the connection.
If a stranded wire is not tinned properly, it may absorb some solder from the surface of the terminal. In that case, you may add a small amount of solder to the connection. Don’t apply too much solder since this may make a bridge between two adjacent terminals.
Remove soldering iron.
Inspect the connections – soldering joints should be smooth and shiny.
Slide heat-shrink tube all the way, up to the body, of the toggle switch.
Apply heat with the heat gun.
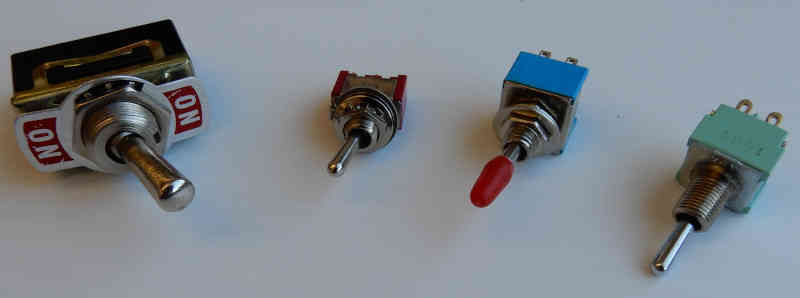
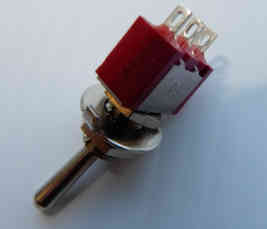
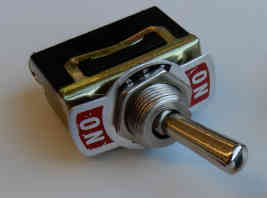
Toggle Switch
There are four groups of toggle switches: SPST, SPDT, DPST, and DPDT.
SP refers for single pole
DP refers to double pole
ST refers to single throw
DT refers for double throw
Poles refer to the number of the electrical circuit controlled by the toggle switch. Single pole (SP) switches control only one circuit.
Throws refer to the extreme position of the handle.
ST switch closes a circuit at only one position while the DT switch closes a circuit in two positions: in the Up position and the Down position (On-On).
This is described in more detail in datasheets for particular toggle switches.
Toggle switches are available in many different colors - it seems that red is the most popular color of toggle switches.
Mouser offers a big inventory of switches (from micro, mini, and push button to a rocker and heavy industrial switches) with volume pricing.
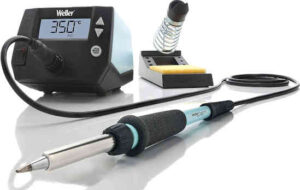
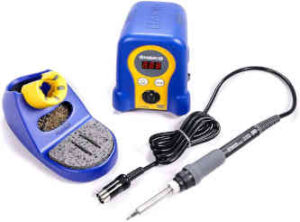
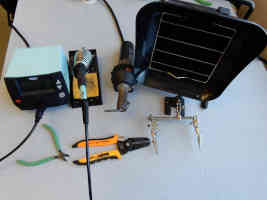
The following tools were used in this “How to solder a toggle switch” guide:
- Soldering iron with the station, iron stand and sponge - Wire stripper
- Wire cutters
- Helping hand tool (also called third-hand tool)
- Heat gun
- Smoke extractor
The following accessories were used in this “How to solder a toggle switch” guide:
- Flux-cored soldering wire 60/40 tin/lead, 0.031” (0.8 mm) diameter
- Rosin flux
- Heat-shrink tubing